Showing posts with label Activities for Kids. Show all posts

Sunday, 24 February 2013

Kid's e World @ The Gardens


This was a back dated post.  We went to Kid's e World during the school holidays last year.  Kid's e World was located at The Gardens.  This is place is really every kids dreams.  It was our first time there.  Kid's e World has a state-of-the-Art Play Land and a lot of specially patterned Toys in Motion.


We went there together with my neighbour's kids.  The entry fees during school holidays was RM 50 per entry.  I almost hesitate to go in at first but the PIC told me that I can opt to buy the weekend voucher instead.  It was RM100 for three visits (valid for three months).   If you go during weekdays, it's cheaper (RM30 per entry).  The first time, lil prince went alone and during our second visit, we brought along our lil princess.

Personally, I like this place a lot.  It is clean and well maintained.  As for my lil prince, no doubt that he absolutely adores this playland.  We spent almost five hours inside.  The kids really had a good exercise because all of them fall asleep on our way back.  While the kids had a good time playing and running around, we the mummies also had a good time chit-chatting.

Here are some photos taken on that day.


Kid's e World

The Gardens Mall:

FF-202, Fourth Floor, The Gardens Mall Mid Valley City, Lingkaran Syed Putra, 59200 Kuala Lumpur.

Monday, 14 January 2013

Vege Painting with Lady Fingers

I was cooking curry with some lady fingers last weekend.  While chopping the heads of the lady fingers, I thought it would be nice to let the kids have some fun with vege paintings.  At least this time round I don't have to waste so much of the vegetables.  I used to buy a whole lady fingers, cut them into half and use it for vege painting.  
I use some crayola paint and let the kids have some fun painting with the top of the lady fingers.  We don't normally do paintings at home as it was a bit messy.  However, after I have used the crayola paint, I find it easy to clean as compared to other paints.  We don't even have to use soap to wash away the paint.   Although it was a little pricey but it saves me a lot of hassle cleaning up.
 My lil prince had lots of fun painting and as for lil princess, she was just messing around with the paint.  This activity sure keeps both of them occupied for some time.  We hope to do more of these activities at home in future :P.  One of my new year resolution this year was to have more Play N Learn activities at home for the kids.  Hopefully I will have the time to do that *keeping my fingers cross* ^__^.


Tuesday, 27 November 2012

Activities for kids - Mix Vege

My lil prince have been pestering me daily to do activities with him.  He saw me giving some motor skills activities (scooping) to lil princess, he too wanted to have some fun on his own.

Yesterday, we made some simple salad.  I used the Watties Mixe Vegetables and my Kewpie mayonnaise sauce.   For a start, I boiled the mix vegetables and allowed it to cool before giving it to my lil prince.

First, he  poured all the mixed vege into a big bowl.  Next, squeeze the mayonnaise in the bowl and mixed them together.  Here's our homemade vege salad.  Simple and Sedap!
What I like best about this activity was to see both my kids eating vegetables!!  Both of them sharing a bowl of mix vegetables prepared by kor-kor.  I realized that in order to get my lil ones to eat more vegetables, they need to be involve in the process of making / cooking them too.  Perhaps, for them, it's all their hard work and that's why they appreciate the food more?
 I love this photo so much.  Both of them sharing a chair together and also a bowl of mix vegetables.  So sweet ^__^


Monday, 29 October 2012

Our DIY Hot Wheels Track


Vroommmmm!!!!

As I was blog hopping one day, I came across Angie’s Journal  and was delighted to see that she is having a giveaway of the Hot Wheels Wall Tracks Mid Air Madness.  My lil prince love anything that has WHEELS! Be it a car, truck, tractor, bicycle and anything with wheels, you name it, it is his favourite.  Hence, I thought of trying my luck and see if Santa Claus will be coming early this year to give a present for my lil prince ^__^.

We search around the house to see what we can find to make our own DIY Hot Wheels Track.  We found an empty to make the base.  We kept the box when we purchase my new PC, now it has become a new toy for my lil prince.  We printed some simple lines (black & white) as road tracks and pasted on the box.   At the bottom of the box were three parking space for the cars.
 After we have pasted the 'roads', I asked lil prince to arrange his ‘road construction’.  The first thing he did was to arrange his cars and lorry in the parking lot.  Then he moved on to make the buildings.  I wrapped some used toilet paper roll with colour paper and told him that these are the buildings.  He said he wanted to have a fire station, a school, a house and a pizza hut.  He proceed to draw his buildings and arrange his building on the box.


A Mini Zoo


We had a mini zoo in the middle and lil prince arranged his animals inside the green box.  Later he told me that he need to build a house for the animals because they need shelter!  He took some blocks and arranged a shelter for his animals.  This pretend play was really fun.  I get to see how creative my lil prince was.  You can see from the photo below that some of his animals were under his so called shelter :P.

Finally, here is my lil prince master piece.   He had a traffic lights and so called petrol station made out of empty boxes.  The polystrene foam at the back was a bridge.  Look at his angry bird at the top!  He said his angry bird is looking after his house  ^__^.   It was indeed a wonderful experience for me to see how creative my lil prince can be.  This simple DIY track are made out of all recycle stuff and my lil prince enjoyed playing with it so much.  
The Hot Wheels Wall Tracks Mid Air Madness is just the right track for my lil prince and also for mummy as it saves so much space.  My lil prince had a few hot wheels cars which he adores so much and I hope that the hot wheels cars will soon have a fantastic track to race on together with our DIY race track!  I am sure both my lil prince and lil princess will be racing like mad with the Hot Wheels Wall Tracks!

Tuesday, 2 October 2012

Painting Activity

Most of the time I was a bit reluctant to let lil prince do painting activity as I find it messy (coz mummy has to clean up).  But on the other hand, sometimes, I noticed that he actually enjoys paintings.  Further more it is also a bit difficult to handle two kids at a time for painting activity as the younger one will be disturbing her brother.

Last weekend, while lil princess was taking her afternoon nap, I took this opportunity to let lil prince do some paintings.

I only took out a few colours (red, green, yellow and blue).  I used my plastic container (from the food cups that I bought from Daiso) to put the water for him to clean his brush (instead of changing the water so often).

He painted three pictures on that day--> a car, a helicopter and a flower.  I know this is no big deal but this was only his second time painting with a brush and somehow mummy is proud of his achievement.  The whole painting session was neat too.  Not as messy as I thought it will be.  These three master piece are still handing in my dining hall as lil prince said it is his artwork!

Perhaps, I need to have more of this painting activities in future.  I guess it's time for mummy to admit that my lil prince is growing up.   

Monday, 1 October 2012

Teaching Lil Princess - Colours

Lil Princess Activity

Lately I've been trying to teach my lil princess COLOURS.   I loved to use flashcards when I teach my kids.  Personally I find them very useful and it also helps me a lot.  When lil prince was young, I started introducing flashcards to him when he was eating.  Lil Princess started slightly late.

I often browse through the internet to get the free printing of flashcards.  I would then print them out and laminate them for my kids.  If I don't laminate them, they get torn easily.
I bought these colourful balls from Daiso last month.  Sorry, I'm not sure what they are called but if I'm not mistaken, they are used for handicraft.  They come in different colours - red, blue, green, yellow and purple.

For this activity my intention was to have my lil princess to differentiate the colours that I've taught her.  I used five colourful bowls that I got from IKEA, placed all the small balls into a container and asked her to separate them.  To start off with this activity I need to teach her how it works and let her continue with the rest.  I got the idea from reading one of the blogs.  That's why I love to read blogs!  I find that reading blogs are so informative:) and most of the time I get lots of motivation by reading other mommies blogs too.

I find this activity very interesting and it is also a test to see whether my lil princess is able to tell the different colours.  Although lil princess is a bit slow in her speech, nonetheless, she is able to understand simple instructions and tries her best to follow mummy's pronounciation whenever I'm teaching her with my flashcards.

I am hoping to have more time to spend with my lil princess and giving her more practical life activities.   I felt that I have been concentrating too much on my lil prince and his homework lately and left our my lil princess :(. 


Sunday, 23 September 2012

2nd Craft Session for De Lil Ones

Back-dated post.....
I was supposed to blog this earlier but I forgotten to download the photos.  Hence, the 3rd one came in before the 2nd one :P.

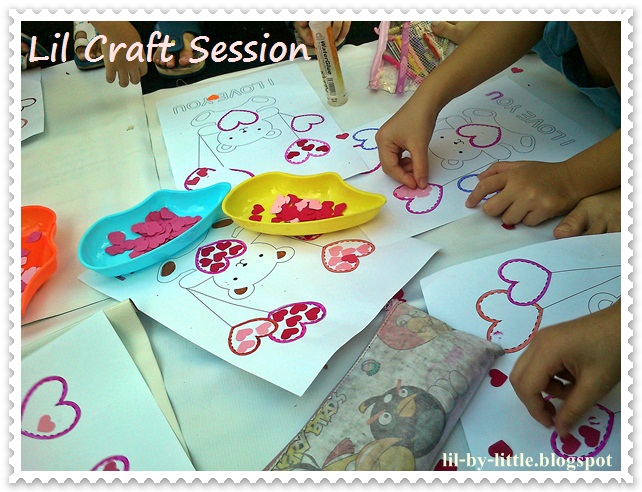
I had my 2nd craft session with the kids in early September 2012.  This time I gave them a piece of paper with a bear holding heart-shaped balloons.

Their task was to paste the 'hearts' inside the balloons and colour the picture.  I punched two different colours of hearts for them to paste and I've also outline the hearts balloons so that they look nicer :P.  I punched the "hearts" for a few days as I didn't expect that it will be so hard to use the puncher that I had.  I even had blisters on my fingers while punching it!  Need to get myself a better puncher next time.

This activity was much easier and the kids get to complete them quite fast.  At the end of the session, I reminded the kids to go home and tell their daddy and mummy ---> I Love You!


This is the lesson of the day--> L-O-V-E!  


One of my favourite bible verse :

1 Corinthians 13:4-8

New International Version (NIV)
4 Love is patient, love is kind. It does not envy, it does not boast, it is not proud. 5 It does not dishonor others, it is not self-seeking, it is not easily angered, it keeps no record of wrongs. 6 Love does not delight in evil but rejoices with the truth. 7 It always protects, always trusts, always hopes, always perseveres.
8 Love never fails. 

Have a nice week ahead!

Friday, 21 September 2012

Merryn’s Eggless Nutty Chocolate Brownie Recipe

After reading about Merryn’s Eggless Nutty Chocolate Brownie Recipe, I was so tempted to give it a try because it sounds so easy! No baking was required and I can even ask my lil prince to be my assistance.
Here are the ingredients (recipe from Merryn’s blog)

22 Marie Biscuits
20gm cocoa powder
40gm roasted nuts
200gm condensed milk

I bought the tiger marie biscuits, cocoa powder, condensed milk and for roasted nuts, I also use cashew nuts and almond nuts as these are my favorites!
The instructions are pretty easy to follow too.  I placed the marie biscuits in my zip lock bag so that it’s easier for  me to break them into pieces.  I gave the bag to my lil prince to break the marie biscuits into crumbs while I chopped the nuts.  Boy!  He had fun breaking those pieces of biscuits and he almost broke my zip lock bag!   


Next we added the cocoa powder, nuts and lastly the condensed milk.    Simple right?  Just mixed everything together and pour into your baking tray.  Let it chill for at least 4 hours in the fridge or overnight.  I pour the mixture into my star shaped silicon molds and the left over I put them in a round plate. 


Here’s my star shaped chocolate brownies.

I cut the remaining chocolate brownies into heart shaped using my cookie cutter and packed them for lil prince snack box yesterday.

My lil prince absolutely loves this chocolate brownies and kept asking for me for more.  I will definitely make this again as it is really simple and the kids love it!  As for the process of making the brownies, I personally enjoyed the mother & son bonding time together in the kitchen.  I was so surprise that my lil prince was so eager to help me out in the kitchen right till the very end and even offer to wash the plates for me. 


You may hop over to Merryn's blog for step-by-step instructions on this recipe.  Thank you Merryn for sharing this lovely recipe!


 Last assignment for the day was to wash the utensils :P